Mask_RCNN在TF2下跑通自己的数据集
论文原文地址:https://arxiv.org/abs/1703.06870
MaskRCNN官方的git地址:https://github.com/matterport/Mask_RCNN
一. 构建数据集
这里参考官方推荐的气球语义分割的例子,这里选用的是和他一致的打标工具 VIA (VGG Image Annotator)。个人感觉这个比labeme好用太多。
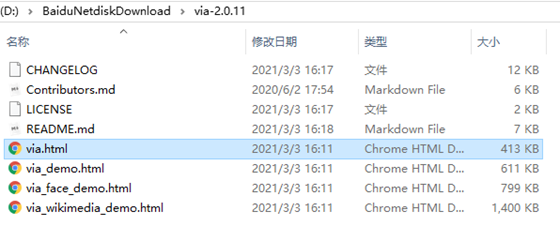
- 直接在VIA官网下载即可,下载完成后如下图所示,直接用浏览器打开
via.html即可开箱使用。

- 选择
Add Files添加图片后,选择Attributes设置打标的label,然后用多边形工具进行打标,如下图。

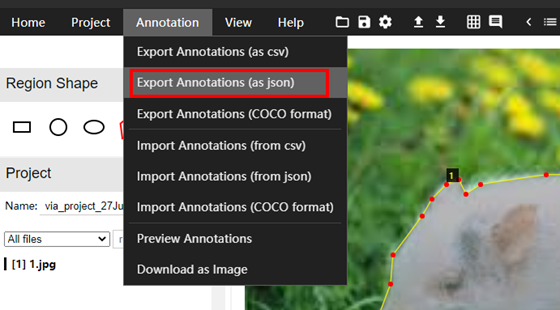
- 输出json格式的打标结果

- 将图片和json结果保存在同一个目录下,构建自己的数据集时可参考我的目录结构。
├─dataset
│  ├─train
│  │  ├─1.jpg
│  │  ├─2.jpg
│  │  ├─3.jpg
│  │  └─annotations.json
│  └─val
│  │  ├─1.jpg
│  │  ├─2.jpg
│  │  ├─3.jpg
│  │  └─annotations.json
二. 准备工作
由于官方的代码只支持tensorflow的版本都是1.x的版本,对于tensorflow 2.x的版本官方代码中很多地方不能调用,这里需要大量修改。
2.1 环境搭建
本人是Windows系统,安装的是11.0版本的cuda,以下是我安装的项目必须的python包。
- scikit-image==0.16.2 这里说一句,如果安装的是更高版本的,最好降低成0.16的,不然可能后面训练的时候会报
Input image dtype is bool. Interpolation is not defined with bool data type,这里参考。 - tensorflow==2.2.0 就是因为tensorflow的1.x版本不支持cuda11.0,才折腾好久….
- keras==2.4.0
- numpy==2.1.0
2.2 源码的替换
之前本人找到一个TF2.0版本的Mask RCNN,哎,但是发现没卵用!
- 下载官方源码:
git clone https://github.com/matterport/Mask_RCNN.git - 替换官方的核心代码
mrcnn下的所有代码。
PS:由于这里改的官方代码中mrcnn/model.py,mrcnn/config.py,mrcnn/utils.py,parallel_model.py需要修改的文件太多,直接给出git地址,大家可以直接下在mrcnn这个文件夹及其下面的py文件对官方的mrcnn这个文件夹进行替换(不然太折腾人了)。
2.3 训练代码修改
-
这里训练的代码参考的是官方的
samples/ballon/ballon.py这个文件,直接复制到主目录Mask_RCNN下,修改成自己想要的名字,比如train.py。 -
修改根地址,这里由于从
samples/ballon/目录到主目录下,因此修改ROOT_DIR = '.' -
修改config类成自己的类,注意我这里是改成了动物类,然后一共是识别2个种类,然后最好这里的
NAME和利用VIA构建数据集中的Attribute一致。
class AnimalConfig(Config):
    # Give the configuration a recognizable name
    NAME = "animal"

    # Adjust down if you use a smaller GPU.
    IMAGES_PER_GPU = 1

    # Number of classes (including background)
    NUM_CLASSES = 1 + 2  # Background + balloon

    # Number of training steps per epoch
    STEPS_PER_EPOCH = 100

    # Skip detections with < 90% confidence
    DETECTION_MIN_CONFIDENCE = 0.9
- 修改Dataset类成自己的Dataset类,同时修改load函数
class AnimalDataset(utils.Dataset):
    def load_animal(self, dataset_dir, subset):
        # Add classes. We have only one class to add.
        self.add_class("animal", 1, "pig")
        self.add_class("animal", 2, "cow")
        .....
        self.add_image(
                "animal",
                image_id=a['filename'],
                path=image_path,
                width=width, height=height,
                polygons=polygons)
- 修改load_mask函数
    def load_mask(self, image_id):
        image_info = self.image_info[image_id]
        if image_info["source"] != "animal":
            return super(self.__class__, 	self).load_mask(image_id)
- 修改image_reference函数
    def image_reference(self, image_id):
        """Return the path of the image."""
        info = self.image_info[image_id]
        if info["source"] == "animal":
            return info["path"]
        else:
            super(self.__class__, self).image_reference(image_id)
- 修改训练函数
def train(model):
    """Train the model."""
    # Training dataset.
    dataset_train = AnimalDataset()
    dataset_train.load_animal(args.dataset, "train")
    dataset_train.prepare()

    # Validation dataset
    dataset_val = AnimalDataset()
    dataset_val.load_animal(args.dataset, "val")
    dataset_val.prepare()
三. 训练
直接在命令行中python train.py train --dataset=./dataset --weights=coco即可看到模型开始训练了。
这里注意2点:
- 用VIA打标好的数据集注意是放到Mask RCNN主目录下,所以这里的命令参数
--dataset=./dataset - 权重用的是coco形式,即
--weights=coco,如果不是的话,你会遇到这类问题mrcnn_bbox_fc/kernel:0' shape=(1024, 8) dtype=float32_ref> has shape (1024, 8), but the saved weight has shape (1024, 324),具体可参考
